
A WordPress Backup, How can a Plugin be Used to Generate It?
Backups may not be the most exciting or enjoyable aspect of website maintenance. However, without a reliable and convenient method for regularly creating backups of your WordPress website, you might end up facing significant consequences when things go awry.
In this article, I will demonstrate a simple and efficient approach to backing up your WordPress website.
Once you have a WordPress backup stored on your computer or in the cloud, restoring your data and your entire website becomes a straightforward process.
To illustrate the steps involved, let’s begin!
Why create WordPress backups in the first place?
I understand, you’ve probably heard this advice countless times, but it’s worth emphasizing once more: ALWAYS keep a backup ready!
Now, picture this scenario: You’re managing a website with a fantastic blog, an impressive portfolio, and a substantial following. Then one day, disaster strikes – your website goes offline, you lose access to the admin area, and everything seems to be going terribly wrong.
The real question is, how will you retrieve all the hard work you’ve invested in building your website?
Creating backups doesn’t demand much of your time or effort, yet they can potentially save you a significant amount of both time and effort in the future.
Naturally, not everyone is familiar with the various WordPress backup tools or the process of restoring backups. If you find yourself in that situation, continue reading!
How to create a WordPress backup?
There are two methods available for creating a backup of your WordPress website:
- Utilize a plugin.
- Manually create a backup.
Each of these approaches comes with its own set of advantages and disadvantages. However, since this article focuses on simplifying the backup process, I would recommend opting for a plugin.
In my perspective, a reliable backup plugin generates a single comprehensive file that contains everything, including your pages, posts, media, users, themes, plugins, and settings – all conveniently packed into one file! Consequently, whenever you need to restore a backup, you can effortlessly revert to a previous state with just a single click.
In the end, when the process is user-friendly and efficient, you’re more inclined to perform regular backups.
Creating a WordPress backup with the All-in-One WP Migration plugin
To simplify the process for both you and me, there are several useful plugins available for creating backups. These plugins handle the task of packaging your website files and database, making them ideal, especially if you’re new to WordPress backup procedures.
Some of these plugins offer free versions with limited features, while others require a premium upgrade for full backup capabilities.
You have a variety of excellent plugins to choose from, but personally, I’ve had great success with one called “All-in-One WP Migration” by ServMask. I discovered it while taking a WordPress course on Udemy, and it has proven to be user-friendly and dependable. Although it’s primarily known for migration, it can also be used effectively for creating backups, and the best part is that it’s both free and easy to use.
Keep in mind that if your WordPress website is quite large, the free version of this plugin may not suffice, as it imposes a maximum backup file size limit of 512 MB. However, for most users, this should be adequate.
If you’re interested in exploring other options, here are a few other popular backup plugins to consider:
Please don’t hesitate to share your thoughts and your preferred backup methods or plugins in the comments below, and kindly use the English language for communication.
Installing the All-in-One WP Migration plugin
You can easily add the plugin within your WordPress admin section by navigating to “Plugins” > “Add New.”
Find the plugin by its name, then select “Install Now.”
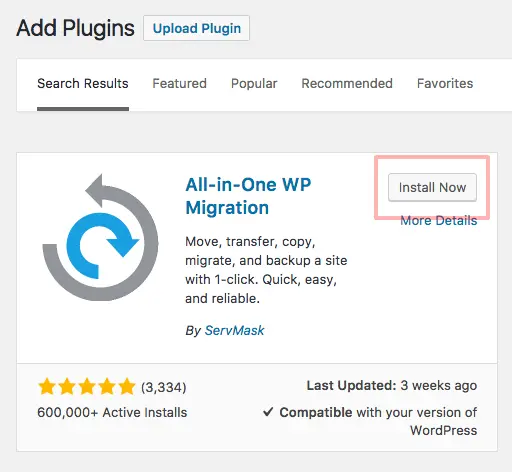
After the installation has finished, select the “Activate” option.
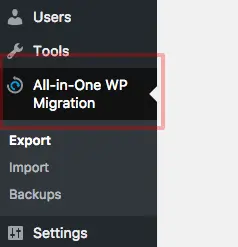
You can now find the plugin in the left-hand navigation bar within your WordPress admin area.
Creating a backup file
To generate a backup of your WordPress website, just go to the “Export” section.
The no-cost variant of the plugin permits exporting to a file, which is the method I’ve been using successfully. However, additional options such as FTP, Dropbox, Google Drive, etc., come with an extra cost.
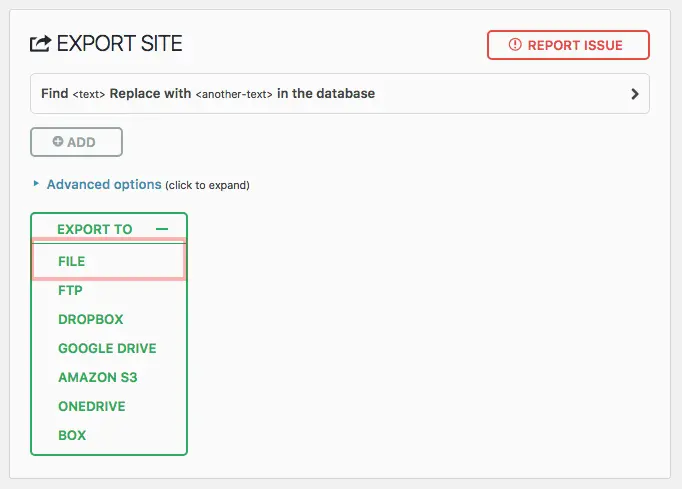
After selecting “Export to File,” the plugin will commence the process of archiving your files and database. You can take a moment to unwind or grab yourself another cup of coffee while it works its magic..

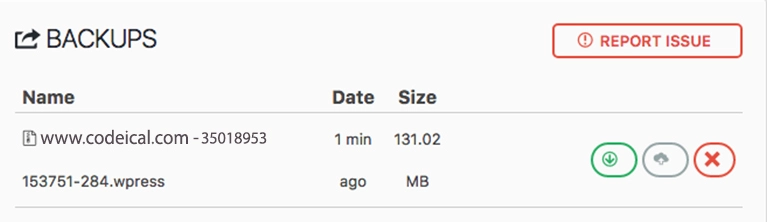
Downloading your WordPress backup file
Once the archiving process is complete, you will notice a green button available for downloading your WordPress backup file.

Just download it, and you’re all set! You’ll have a complete backup of your entire WordPress website on your computer with a .wpress file extension. This backup file can be handy for transferring your website from one domain to another or from a staging environment to a live one. However, make sure not to save your backup files on your web host’s server. My practice is to maintain one backup on my computer and another in the cloud for easy access from anywhere.
Reviewing your past backups
How to restore a WordPress backup with the plugin
Typically, backups come in handy when you’re setting up a new WordPress installation, such as when your website experiences a crash or during server migration. In less severe cases, you might also find backups useful after making adjustments to your theme. In such situations, you can easily recover your previous WordPress setup by restoring a backup.
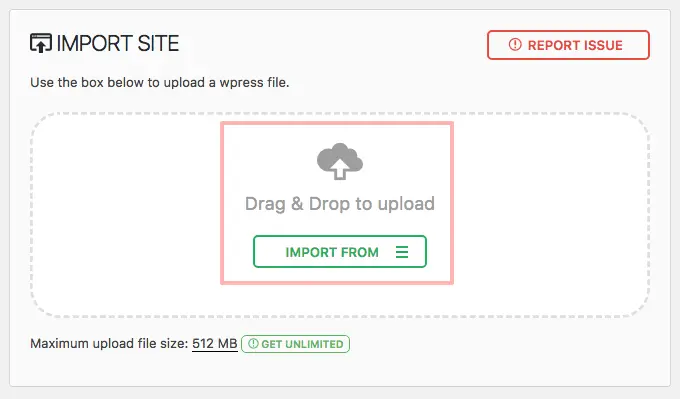
Importing your WordPress backup from a file
Feel free to access your WordPress admin section and proceed with the instructions outlined earlier for installing the All-in-One WP Migration plugin.
Afterward, you can locate the plugin on the left-hand side of your admin interface. Navigate to the “Import” section, and you will encounter the following:
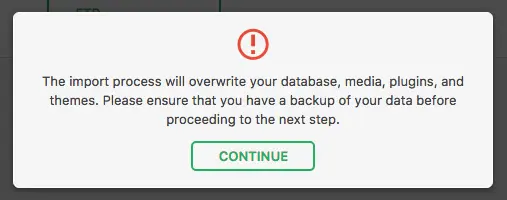
As you initiate the import, a progress bar will appear along with a cautionary message indicating that the backup restoration will replace all current data on your website.
To complete the process of restoring the backup, you will be provided with the following guidelines:
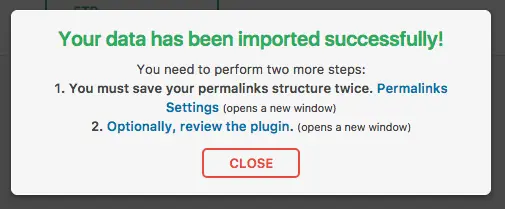
Here are the steps to follow:
- Re-login using your previous login credentials after restoring the backup, which includes your old login information.
- Once you’re logged in, go to the WordPress admin area and access “Settings > Permalinks,” then click the “Save Changes” button twice. Yes, twice!
- Last but not least, explore your website and ensure that everything is functioning correctly.
Alternative way: importing a backup file from server
Regrettably, the plugin doesn’t always function as smoothly as anticipated. Occasionally, the import process may experience freezing issues.
Fortunately, there’s an alternative method for importing your WordPress backup through the plugin. You have the option to upload your backup file to your web host’s server and perform the import from there.
To accomplish this, you’ll require FTP access to your webspace, and you can obtain the login details directly from your web hosting provider.
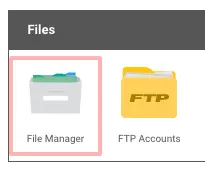
Alternatively, you can utilize a File Manager within your web host’s Control Panel (CP). The interface may vary depending on your hosting company’s specific CP design.
Here’s a step-by-step guide on how it operates:
-
- Begin by accessing your WordPress installation folder either through an FTP client or using your web host’s Control Panel (CP).
- Inside the wp-content directory, there’s a dedicated folder for the plugin’s backups called “ai1wm-backups.” You’ll want to upload your backup file, which should have the file extension “.wpress,” to this folder, just like it’s illustrated in the image above.
- Next, head over to your WordPress admin area and navigate to “All-in-One WP Migration” and select “Backups.” You should be able to spot the backup file you recently uploaded among the available backups.
- Click on “Restore” to initiate the restoration process. Keep in mind that, just like when performing a direct import through your WP admin area, you’ll need to log in again using your WordPress website’s credentials after the backup is fully restored.
- Now, go to “Settings” and select “Permalinks.” Click on “Save Changes” not once, but twice!
- Lastly, take a moment to visit your website and verify that everything is functioning as it should.
Final thoughts: How to create a WordPress backup
I trust that you’ve already taken the necessary steps to back up your WordPress website. It’s a relatively straightforward process when using the appropriate tools, providing you with the peace of mind that your WordPress site is always within reach, just in case.
There are various methods available for creating and managing backups. While this post primarily focuses on the All-in-One WP Migration plugin, you have the flexibility to explore alternatives that suit your needs. I opted for this particular plugin because it’s both free and exceptionally user-friendly.
It’s worth noting that premium plugins often offer additional benefits, such as malware scanning and automatic storage of backups on their cloud servers.
Regardless of the tool and approach you select, it’s advisable to establish a routine for creating backups. After doing it once, you’ll gradually develop a habit, and subsequently, creating backups whenever you update or make adjustments to your website will become second nature.
I hope you found this post to be informative and valuable! Feel free to share your preferred methods for creating WordPress backups in the comments below!
Wishing you a productive coding experience!
– CODEICAL
Read Also: 9 Compelling Reasons to Utilize WordPress for Website Projects in 2023