
Manually Installing WordPress: A Step-by-Step Guide
If you wish to commence a blog or website with WordPress, the initial step involves the installation of WordPress on your web hosting space. While many web hosting providers offer automated installation options, these often include unnecessary plugins and elements that can slow down your website. Therefore, to ensure a speedy WordPress website, it’s recommended to opt for manual WordPress installation.
Even if you’re new to WordPress and have no prior experience in website creation, there’s no need to be concerned. This article will guide you through seven practical steps for manually installing WordPress, providing a detailed, step-by-step process.
You will gain proficiency in:
- Manually installing WordPress
- Creating a MySQL database
- Transferring your WordPress files to your web hosting space using FTP
Continue reading for more information!
Why Should You Use WordPress for Building Websites?
WordPress is a versatile all-in-one website solution for a reason. Nowadays, you can utilize WordPress to construct virtually any type of website. For instance, if you’re aspiring to become a freelance web developer, WordPress can significantly expedite the process of creating comprehensive websites for your clients.
The great news is that you won’t find yourself stranded when you have questions about WordPress. It stands as the most widely used Content Management System (CMS) globally, ensuring that you can always seek assistance and support within its extensive global community.
If you’re new to WordPress, I recommend reading my article that highlights the fundamental reasons why WordPress is the ideal tool for swift and straightforward website development.
Nonetheless, while WordPress touts a quick and easy installation process (the famous 5-minute installation), manual installation might take a bit more time. It’s crucial, therefore, to pay close attention to specific key points during the manual installation. This diligence will ensure that everything is set up correctly, preventing potential technical issues in the future.
7 Easy Steps for Installing WordPress Manually:
In this post, we will guide you through the necessary steps to ensure the smooth operation of your WordPress website. The process involves the following actions:
- Downloading WordPress from WordPress.org.
- Accessing your cPanel.
- Creating a database within your web hosting provider’s cPanel.
- Configuring your ‘wpconfig.php’ file.
- Utilizing an FTP client.
- Uploading the WordPress installation files to your web space.
- Manually installing WordPress.
To perform a manual WordPress installation, you must first register a domain name and sign up for web hosting. There are numerous reputable web hosting providers to choose from, giving you the freedom to select the one that best suits your needs.
Step #1: How to download the WordPress.org software
To begin, please visit wordpress.org/download and acquire the most recent WordPress version.
On the right side of the page, you’ll spot a blue button for downloading the ZIP archive.
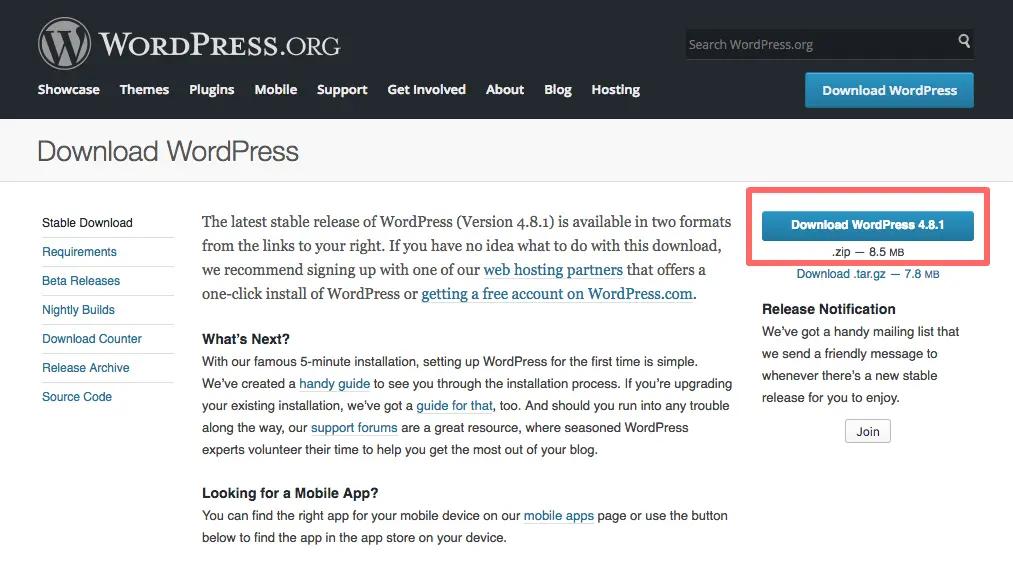
To initiate the process, please select the button to begin downloading the file. The ZIP archive encompasses the entirety of WordPress core files, enabling you to establish a fresh WordPress website.
Next, establish a new directory for the WordPress core files and extract the contents into this freshly created folder. Here’s a glimpse of what’s enclosed within the ZIP archive:
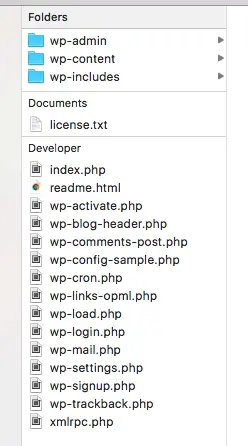
As you can observe, the complete software comprises three folders and numerous distinct files located within the main folder.
Step #2: Log in to your Control Panel
In order to set up WordPress on your web hosting, you must first have access to your web host’s Control Panel, commonly referred to as cPanel. This Control Panel is essential for creating the required database for WordPress.
To access your cPanel, simply log in using the credentials provided by your web hosting provider. These login details will be furnished to you upon signing up for a web hosting plan. For instance, if you opt for any web hosting service, you can expect to receive an email containing your login information immediately after completing the signup procedure.
Step #3: How to create a database for WordPress
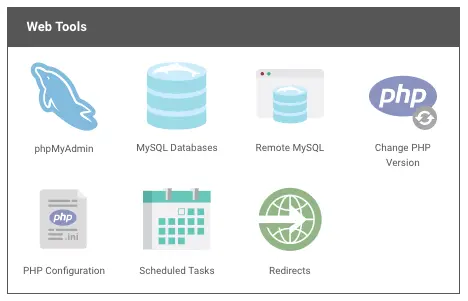
To establish a database, locate the database management section within your hosting provider’s cPanel interface.
The commonly used tool for overseeing databases is typically referred to as “phpMyAdmin.”
However, it’s possible that your web hosting provider offers an alternative, user-friendly tool specifically designed for database creation, such as “MySQL Database Wizard” or a similar name.
If you’re uncertain about which tool to utilize, consult your service provider’s Q&A section or reach out to them directly for guidance.
Here’s an example of what it appears like in my control panel (CP):
In this instance, I would navigate to the MySQL Databases section. Once there, on the subsequently displayed page, I have the option to establish a fresh MySQL database.
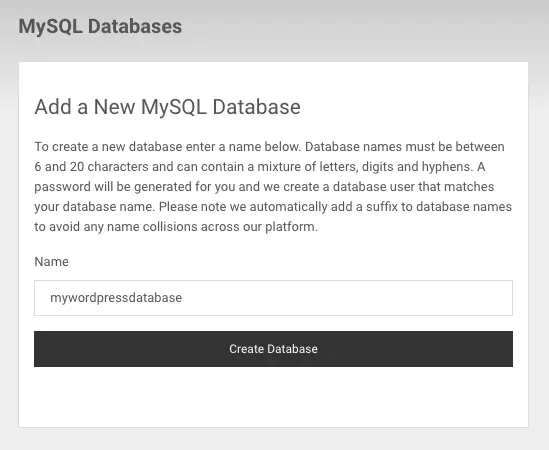
Just enter a meaningful name for your database, such as “mywordpressdatabase,” for example.
Proceed to establish a fresh database, and also choose a username and password for this database.
Lastly, grant your username full privileges, enabling you to create, edit, and update tables within the database.
At this point, the database is devoid of any tables, but there’s no cause for concern as WordPress will automatically populate them during the installation process.
Step #4: How to create a wp-config.php file
Afterward, you’ll need to establish a connection between the database you’ve recently generated in the previous phase and the fresh WordPress installation. During this time, your web hosting provider will be in the process of preparing and configuring the database, which may take a few minutes.
Initially, locate the WordPress ZIP file that you’ve just obtained and unpacked.
Next, locate a file named “wp-config-sample.php.” This particular file holds the fundamental configuration settings for your manual WordPress installation, including the specifications for your newly created MySQL database.
You can find this file within the main directory of the extracted set of files and folders.
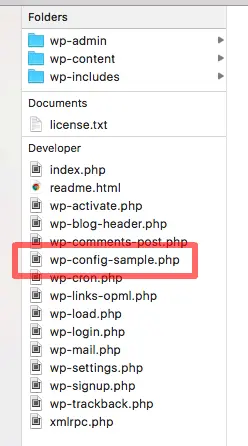
- Change the name of the file “wp-config-sample.php” to simply “wp-config.php.”
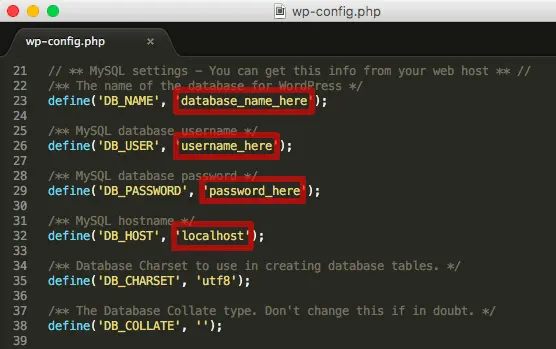
- Open the “wp-config.php” file using a text editor such as “Atom,” “Brackets,” “Sublime Text,” or “Notepad++.“
- Now, you should make modifications to the following entries within the file for your MySQL database:
- Database name
- Username
- Password
- Hostname
All of this information can be located in your database overview within your web hosting Control Panel. Refer to the screenshot below for the specific areas you need to update in your text editor:
Step #5: Create an FTP connection for file transfer
You’ll now have to proceed with the process of transferring the files to your web host’s server.
To accomplish this task, you’ll require an FTP client, like Filezilla. There are various reliable clients available, and Filezilla happens to be my preferred choice, which I’ve been using for quite some time.
When using Filezilla, input your host address (e.g., ftp.example.com), your FTP username, your FTP password, and the designated port at the top of the application window.

Typically, the port number for regular FTP is 21, while for SFTP, it’s 22. To establish a connection with the server, simply click on “Quickconnect.”
Step #6: How to transfer WordPress installation files using FTP
Once you’ve successfully established your FTP connection, it’s time to migrate the WordPress installation files to your web host’s server.
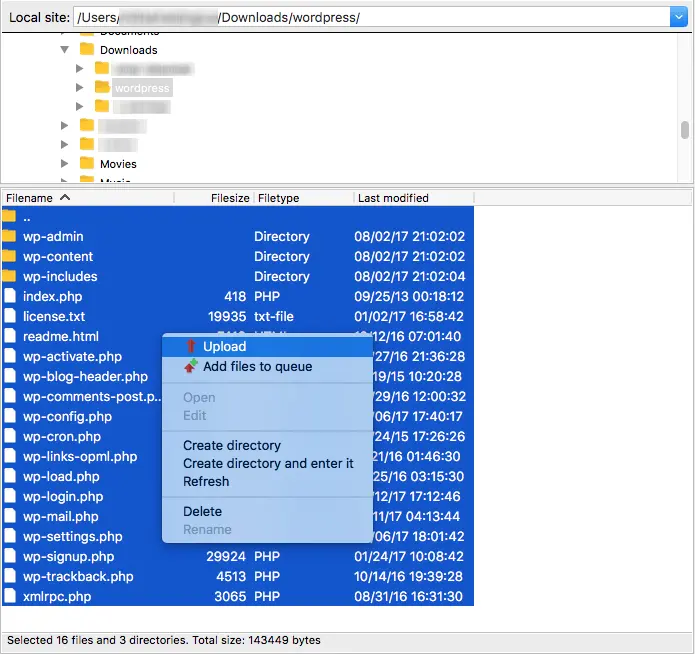
In your FTP client, such as Filezilla or FireFTP, you’ll notice a screen divided into two columns, one on the left and one on the right:
- The left column displays the files on your local computer.
- The right column displays the files and folders on your web host’s server.
To begin, locate the WordPress installation files on your computer in the left column. Navigate to the directory where you have stored your wp-config.php file and all the other files that were originally included in the ZIP archive you downloaded from wordpress.org.
Next, on the right side of your FTP client, locate the folder within your web space where you intend to install WordPress. Typically, you’ll find a folder named “public_html” or “www.” This is the root directory where you should transfer your WordPress installation files. If you’re uncertain about which folder to choose, it’s advisable to contact your hosting provider for guidance.
Subsequently, in the left column of your FTP client, select all the files within the “wordpress” folder. To proceed, right-click on the files and choose the “Upload” option or utilize the “Upload” button found in the navigation bar of your FTP client.
The file transfer process may require some time. Once it’s completed, you can proceed to the actual installation phase.
Step #7: Finish the installation: Install WordPress Manually
Nearly finished! There’s just one final step remaining to manually install WordPress:
Enter the URL of your upcoming website into your web browser, which is the domain name you’ve acquired for your WordPress site.
Initially, you’ll be presented with the initial stage of the installation process, where you’ll be required to select the language for your WordPress installation.
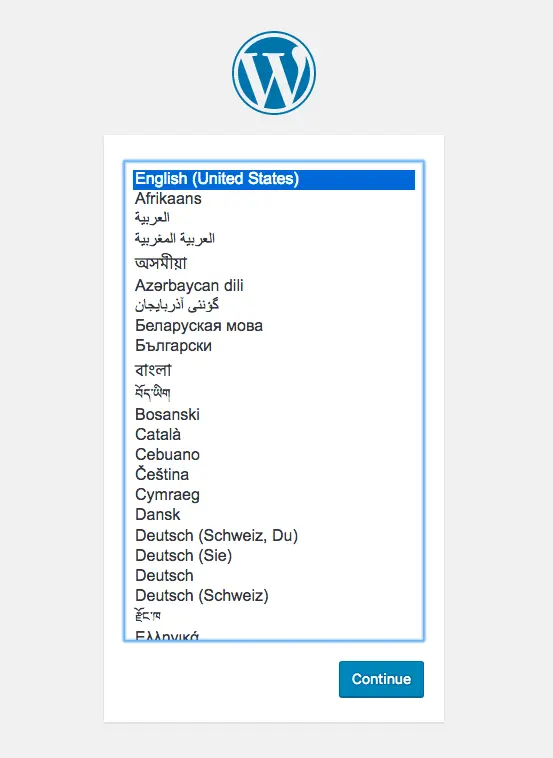
Simply press “Continue” to move forward.
In the subsequent page, you’ll be required to provide information for the website title, your username, password, and email address.
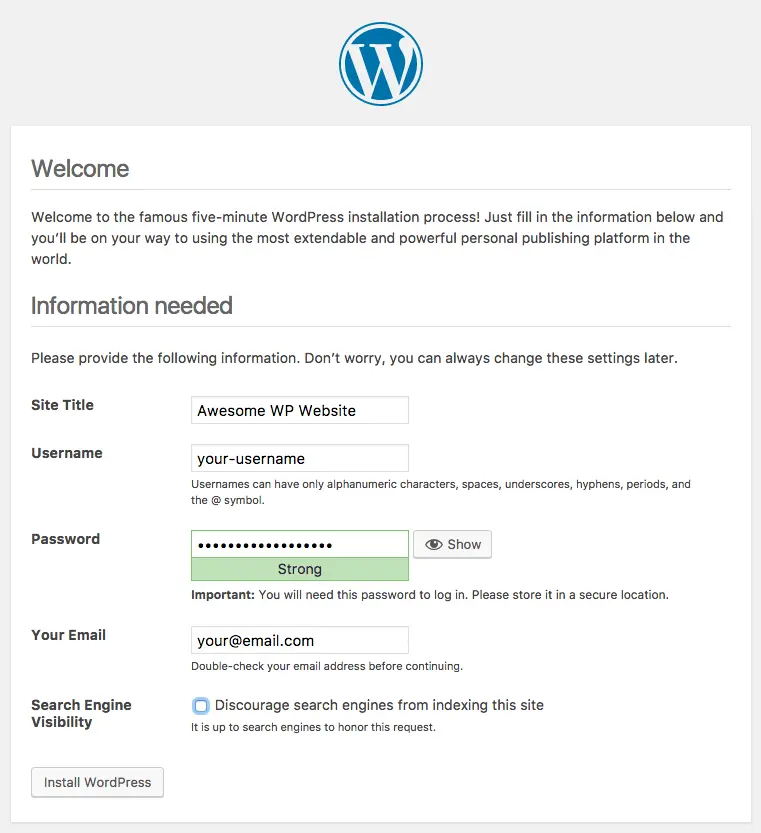
Moreover, you have the option to prevent search engines from including your freshly launched website in their indexes. If you’re in the initial stages of setting up your new WordPress site, I suggest marking this option.
You can always revisit your WordPress admin panel later to disable this option once your website is fully prepared for public viewing.
Lastly, simply click the “Install WordPress” button.
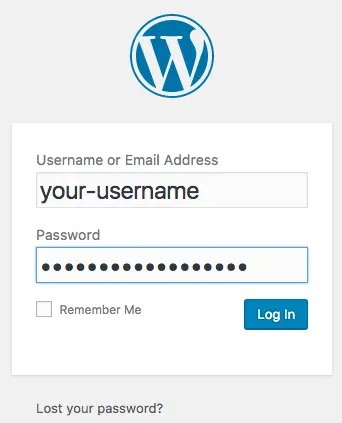
Here’s the exciting part: You’ve successfully completed the process!
Now, access your WordPress admin dashboard using the login details you established during the installation.
And behold, you now have a stunning and newly refreshed WordPress admin area dashboard!
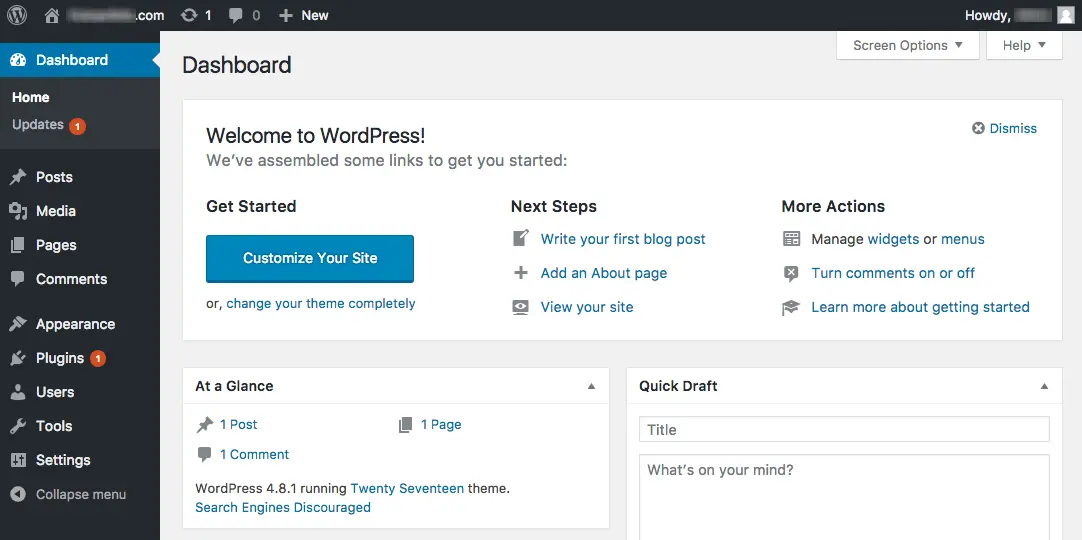
That’s everything you need; you’re ready to go!
Final thoughts: How to Install WordPress Manually – Step-by-Step Beginner’s Tutorial
Even if you have no prior experience with WordPress, installing it manually is a fairly straightforward process. While it may initially seem complex, just follow the steps outlined above with attention.
Once you’ve completed the manual installation of WordPress, you’ll be ready to begin using it to create web pages and blog posts, customize its appearance with an appropriate WordPress theme, and explore its various features.
If you found this guide on manual WordPress installation helpful, feel free to leave a comment to let me know!
P.S. If you found this article informative, please consider sharing it with others so they can benefit from it as well! Thank you for your support!
I look forward to connecting with you in the next post!
– Codeical